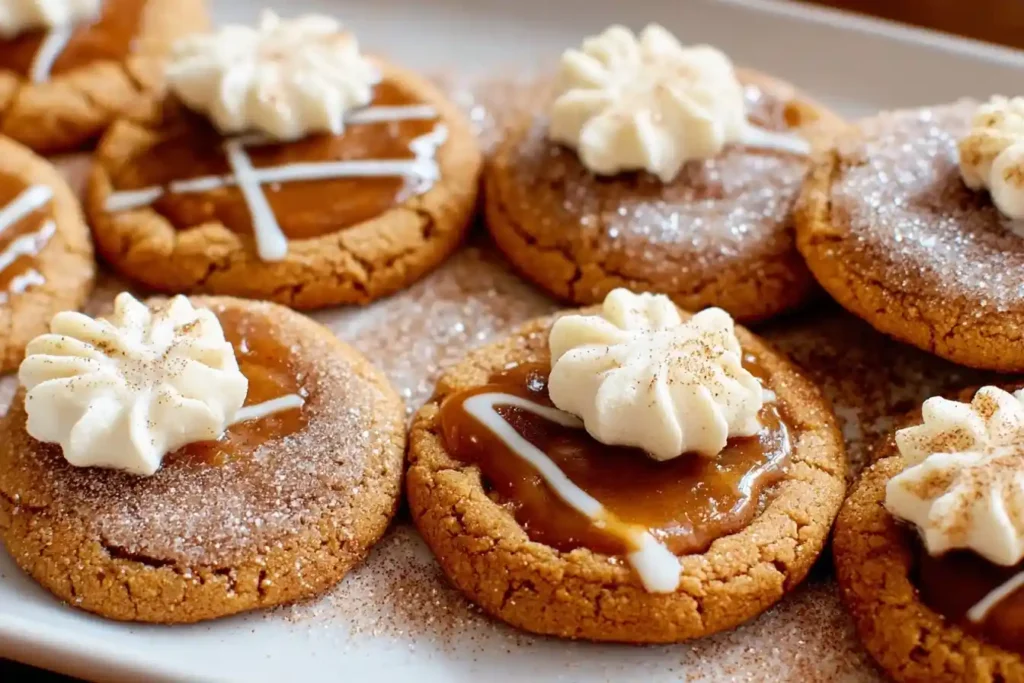

Spiced Pumpkin Pie Cookies with Cream Cheese Glaze
Ingredients
Equipment
Method
- In a medium bowl, whisk together the sifted flour, baking soda, baking powder, salt, and pumpkin pie spice. Set aside.
- In a large bowl, using an electric mixer, cream together the softened butter, granulated sugar, and light brown sugar on medium speed until light and fluffy, about 2-3 minutes.
- Beat in the pumpkin puree, egg, and vanilla extract until well combined and smooth, scraping down the sides of the bowl as needed.
- Gradually add the dry ingredient mixture to the wet ingredients, mixing on low speed until just combined. Do not overmix. The dough will be soft.
- Cover the bowl with plastic wrap and chill the dough in the refrigerator for at least 15-20 minutes. This helps prevent spreading.
- Preheat your oven to 350°F (175°C). Line two baking sheets with parchment paper.
- Using a 1.5-inch cookie scoop or two spoons, drop rounded spoonfuls of dough onto the prepared baking sheets, about 2 inches apart.
- Bake for 10-13 minutes, or until the edges are set and lightly golden, and the centers are still slightly soft. They will puff up slightly. Baking time may vary depending on your oven.
- Remove the cookies from the oven and let them cool on the baking sheets for 5 minutes before transferring them to a wire rack to cool completely.
- While the cookies are cooling, prepare the glaze. In a medium bowl, beat the softened cream cheese and butter with an electric mixer until smooth and creamy.
- Add the sifted powdered sugar, 1 tablespoon of milk, vanilla extract, and a pinch of salt. Beat on low speed until combined, then increase to medium and beat until smooth. If the glaze is too thick, add the remaining milk 1 teaspoon at a time until desired consistency is reached.
- Once the cookies are completely cool, drizzle or spread the cream cheese glaze generously over each cookie. Allow the glaze to set for about 15-20 minutes before serving.
Notes
Pro Tips for Making This Pumpkin Pie Cookies
Over the years, I’ve gathered a few little secrets that make all the difference in achieving that perfect cookie magic. These insights, born from countless batches and a sprinkle of baking mishaps, will help ensure your Pumpkin Pie Cookies turn out beautifully every time.
My Secret Trick: I always make sure my butter and cream cheese for the glaze are at true room temperature. This ensures a wonderfully smooth, lump-free frosting that spreads like a dream, giving your cookies that professional touch and delicious texture.
When measuring your flour, always spoon it into the measuring cup and level it off with a knife. This prevents over-measuring, which can lead to dry cookies – and we want these to be beautifully soft!
Don’t be tempted to overbake! These soft pumpkin treats are best when just set, with lightly golden edges. They’ll continue to firm up slightly as they cool, so pulling them from the oven at just the right moment is key to their tender texture.
For a perfectly uniform cookie, use a cookie scoop. It ensures each Pumpkin Pie Cookies is roughly the same size, promoting even baking and a lovely presentation on your dessert platter.
Fun Variations for Pumpkin Pie Cookies
Baking is all about embracing creativity and making a recipe truly your own! These cookies are a fantastic canvas for a little culinary imagination, allowing you to play with flavors and textures. My friend, who adores a bit of warmth, often asks me to swirl in a touch of finely grated fresh ginger or a pinch of ground cloves into the cookie dough for an extra layer of spice in her Pumpkin Pie Cookies.
Chocolate Chip Delight: For those who can’t resist a classic, fold in a cup of mini chocolate chips or white chocolate chips into the dough. The melty pockets of chocolate are simply divine with the pumpkin and spice.
Nutty Crunch: Add a ½ cup of finely chopped pecans or walnuts to the cookie dough for a lovely texture contrast. Toasted nuts enhance their flavor even more!
Citrus Zest Sparkle: For a brighter note, try adding a teaspoon of orange zest or lemon zest to the cream cheese glaze. It offers a subtle tang that beautifully complements the rich pumpkin flavor, especially for those who enjoy a little zing.
What to Serve With Pumpkin Pie Cookies
These delightful cookies are perfectly wonderful on their own, but sometimes, a little accompaniment can elevate the experience into something truly special. I often find myself dreaming of pairings that enhance their cozy, autumnal charm.
I absolutely adore serving these Pumpkin Pie Cookies with a steaming mug of spiced apple cider on a cool evening. The warm, fruity notes of the cider are a comforting match for the pumpkin and spice. For a more decadent treat, my family always loves a scoop of vanilla bean ice cream alongside them – especially if the cookies are still a little warm! And if you’re looking for a simple, elegant finish, a dusting of cinnamon sugar right before serving adds a touch of sparkle and extra flavor that truly complements these sweet rounds. For an afternoon pick-me-up, a fresh brew of your favorite coffee or a comforting cup of [[chamomile tea]] makes for a perfect companion.
How to Store Pumpkin Pie Cookies
After all the love and effort you’ve poured into baking these delightful treats, you’ll want to make sure they stay as fresh and delicious as possible! Properly storing your Pumpkin Pie Cookies ensures that their soft texture and warm flavors linger for days.
Fridge Storage: Because of their cream cheese glaze, these cookies are happiest when stored in an airtight container in the refrigerator. They’ll stay wonderfully fresh for up to 3-4 days. I always place a piece of parchment paper between layers to prevent the glaze from sticking.
Freezer Friendly: For longer storage, you can freeze the unglazed cookies for up to 2 months. Once completely cooled, place them in an airtight freezer-safe bag or container. Thaw at room temperature, then prepare the fresh glaze and frost them just before serving. My personal tip is to always label and date my freezer containers so I know exactly what deliciousness awaits!
Reheating & Serving: If you prefer your Pumpkin Pie Cookies slightly warm, you can gently heat them in the microwave for a few seconds. The glaze will soften beautifully, making them feel freshly baked again.
Nutritional Benefits
While we bake primarily for joy and flavor, it’s lovely to know that these cookies also offer a little goodness! The star of our Pumpkin Pie Cookies, pumpkin puree, is a fantastic source of Vitamin A, which is wonderful for vision, and provides some dietary fiber. It’s a treat that’s both satisfying and nourishing, embodying my philosophy of combining indulgence with simple, wholesome ingredients.
FAQs
Faq 1
Can I use fresh pumpkin instead of canned?
Absolutely! If you prefer to use fresh pumpkin, you’ll need to cook and puree it until smooth. Just ensure it’s well-drained to avoid excess moisture that could alter the texture of your Pumpkin Pie Cookies.
Faq 2
What if I don’t have pumpkin pie spice?
No worries, my dear! You can create your own blend. I often mix cinnamon, nutmeg, ginger, and a tiny pinch of cloves. This homemade blend will still give your Pumpkin Pie Cookies that quintessential autumn flavor.
Faq 3
Can I make the cookie dough ahead of time?
Yes, you can! The cookie dough can be prepared and refrigerated for up to 24 hours. This makes for easy baking when you’re ready for fresh Pumpkin Pie Cookies, perfect for busy schedules.
Faq 4
How do I prevent the cookies from spreading too much?
Chilling the dough is key! I always recommend chilling the dough for at least 30 minutes, or even an hour. This helps firm up the butter, which prevents your Pumpkin Pie Cookies from spreading excessively during baking.
A Sweet Invitation to Bake
And there you have it, my friends – a recipe for Pumpkin Pie Cookies that promises to fill your home with warmth and your heart with joy. These soft, spiced delights, crowned with their creamy frosting, are more than just a treat; they’re an invitation to slow down, savor the season, and create those precious moments that truly make life sweet. So go on, gather your ingredients, put on your apron, and let’s bake some beautiful memories together! Happy baking!